Saturday, September 24, 2011

Sunflowers

 As Summer comes to an end and Fall is beginning, here's a fun Summery-Fall Nail Art Design of Sunflowers!  Our fair city was having it's annual Fall Fest and the buttons for the event had Sunflowers on the, so to fit in with the Festival, I made these....


Here's my right hand, which I painted with my left.  
Usually when I do a mani, I do paint both hands the same design.

Left hand again. (painted with right)

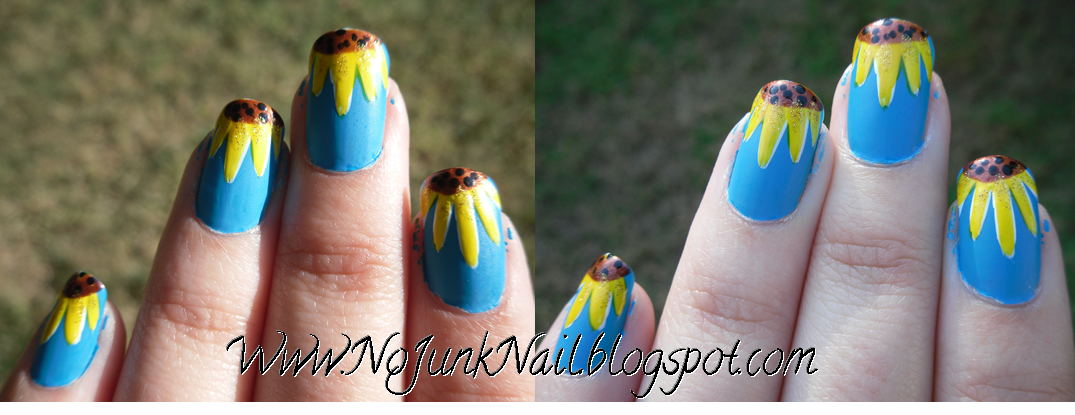
And a side-by-side comparison of sunny and shade

Did you notice I trimmed my nails.  :(  It needed to be done.  My nails were getting so long that it was difficult to type at work, and they were about to drive my batty!  So I trimmed them.  I hate how after a trim, they always feel sharp and awkward for a day or so.  I filed the tips with a buffer to try to minimize that, and it helped.  Another way to combat that is to put on thicker polish, so I started with two coats of Sally Hansen Double-Duty and that helped tremendously!  
The blue is Sally Hansen Xtreme Wear Blue Me Away.  (Having a great base will help me avoid blue staining when I take these off, because blues like this tend to stain nails!)  Blue Me Away is a great opaque polish and I only had to use a single coat!  Then I added Hard Candy Matte-ly in Love topcoat over just the blue to make it more sky-like and less shiney so the sunflowers would stand out more.  
To do the sunflowers themselves, I started with a white striping brush from Kiss Nail Art because I knew my yellow wouldn't cover over the blue.  Then I use a yellow striping brush from L.A. Nails for the petals.  If you look really closely you can see I left some white around the edges for depth.  I used NYC Fifth Avenue as the center of the sunflower with little dots of Sally HAnsen Xtreme Wear Black Out.  And as a last little touch, I used a gold glitter striping brush from L.A. Nails to add some gold litter to the center of the petals. 

I love how these turned out and how BRIGHT and cheery they are!  I may have to leave them on for a while because they just make me smile.  :)


Monday, September 19, 2011

Denim and Patches

Polish-aholics Anonymous Facebook Group Weekly Challenge this week was "Patchwork".  After looking around the web at some ideas, they all seemed a bit the same, until I found this one here on YouTube.  So I pulled out my stash and created these....Denim and Patches.


I had HOPED to use a plastic baggie to make my own little heart stickers, but that was a total flop!  I made them last night and today, but when I tried to pull them off, they were really difficult to get off and then they tore.   :(  They were really cute, too....


So I had to paint the little hearts directly on my nails.  I started out with Sally Hansen Double Duty Base and Top Coat.  Blues are notorious for staining nails, so don't skip the base coat!  Then I use a single coat of Pure Ice Celestial.  To make the Denim look, I swirled together Pure Ice Celestial and Splash with Sally Hansen Xtreme Wear Marine Scene, Blue It and Blue Me away in rough marbly swirls.  Then using a sponge, I sponged that mixture onto the nails.   They really do look pretty denim-y!  


The rough sponging also is hiding a secret....my thumbnail is being held together with a teabag!  The corner of it is splitting, so I used "The Teabag Method" found here.  So far, it's working!

Anyway, after the sponging, I used my black nail striping brush to do the outlining of the hearts like this...


I used other striping brushes I have from Kiss Nail Art and L.A. Colors to fill in the hearts, then went back for some details and touch up on the black.

(Before Clean-Up)

(After Clean-Up)


Saturday, September 17, 2011

Put Your Paws Up!

Friday night was the first home football game for our hometown high school.  So in honor of the event, Put Your Paws Up nails!

(P.S. - This is clearly my right hand,
 thus painted with my left hand so give me a little break)
(P.S.S. - the M&M's are still on my left hand.  You missed those?
 Check them out here...they could very well be my FAVORITE of all-time!)


I started with a single coat of Sally Hansen Double-Duty as a base coat.  Then the pinky, ring, and middle fingers (and thumb, not pictured) have two coats of Sally Hansen Xtreme Wear Black Out and the index has two coats of Sally Hansen Xtreme Wear Cherry Red.  On all nails, I used a single coat of Sally Hansen Instra-Dri (hey, I was in a hurry!)  All nails were then topped with Hard Candy Matte-ly In Love.  Paws were made with my dotting tool and a bottom later of Sally Hansen Xtreme Wear Celeb City with Pure Ice Crimson on top.  The "C" was made with Kiss Nail Paint (striping brushes) in black and silver glitter.

In case you were curious.....the home team won!  

Friday, September 16, 2011

M&M's Characters Nails

I'm part of a Facebook group called Polish-aholics Anonymous.  Each week they have a Monday Challenge and this week it was Candy-Inspired.


So I did these little guys......

They're the M&M Characters!!!!

I had a BLAST researching the little nuances of each character - they're eye shape, eyebrow position, mouth expressions.  Orange is always panicky, Blue is the cool dude, Red is usually mad at something stupid Yellow did, Yellow is usually clueless and goofy, and then there's GREEN, the sexy and smart lady of the group!  I JUST LOVE how these turned out!  They may very well be my all-time favorites!!!


I started each nail with Sally Hansen Double Duty Strengthening Base and Top Coat.
Orange - first coat of Sally Hansen Xtreme Wear Sun Kissed, then a single coat of Pure Ice Hot Tamale on top of that
Blue - two coats of Sally Hansen Xtreme Wear Blue It
Red - first coat of Sally Hansen Xtreme Wear Cherry Red with Pure Ice Crimson on top
Yellow - one coat of Sally Hansen Xtreme Wear Mellow Yellow with Pure Ice Excuse Me on top
Green - two coats of Crayola Green Apple (scented!!)
Then I put a coat of Sally Hansen Insta-Dri on just the colors.
To make the faces, I used Cover Girl White on White, Sally Hansen Xtreme Wear Black Out, Kiss Nail Art Pain striping brush in black and a little Sally Hansen Xtreme Wear Emerald City for Green's lips.

Did I Mention I LOVE THESE!!!  Hope you enjoy them, too!!!
~Aly

Saturday, September 10, 2011

Java!

After I made a table runner with this fabric......
I KNEW I had to do nail art like it!


So I pulled out the polishes and a NEW toy - Hard Candy Matte-ly in Love!  
Here's the finished nails then I'll back up to talk about the Matte top coat.


Just for kicks, here are pix before and after I added the matte top coat:


Okay, enough pictures.  :D


Here's the list of polishes I used:
3 coats of NYC East Village
topped with Hard Candy Matte-ly in Love
Sally Hansen Xtreme Wear Gun Metal
NYC Sidewalkers
NYC Canal Street
NYC Bryant Park
NYC Fifth Avenue
Sally Hansen Green with Envy
Pure Ice Celestial
and topped it all with Matte-ly in Love

Labor Day Nails #3 - V-French Pink Dots

And here's the last one from last weekend on my Mom.
(this one turned out slightly less than spectacular - sorry Mom!)


Polishes Used:
My Mom put on her base coat and I'm not sure what it was
Kiss Nail Art Paint white
Dots with Wild Thing

Labor Day Nails #2 - Pink Sparkly Dots

Here's the second Labor Day Nail Art on my soon-to-be sister-in-law:


Polishes Used:
Pure Ice Flirt Alert
Sally Hansen Xtreme Wear White Out with dotting tool
Nail jewels from Kiss
Coat of Sally Hansen Xtreme Wear clear coat

Labor Day Nails #1 - Limes and Gunmetal

Over the Labor Day weekend here in the US, I went to visit my family and I got to paint nails!  


Here's Limes and Gunmetal on my future sister-in-law:


Polishes Used:
Sally Hansen Xtreme Wear Hard As Nails Gunmetal
Sally Hansen Xtreme Wear Hard As Nails Green with Envy
Kiss Nail Art Paint Silver Glitter

22 FOLLOWERS!

THANK YOU to everyone who is now "following" me!
I went from 13 to 22 in just a short time!
THANK YOU!!


And a special THANK YOU to Bee who was #14!


Look for four new designs coming right up!

Friday, September 2, 2011

13 Followers and Watermarbling

I now have THIRTEEN followers!  I'm not at all superstitious, but do ya think you can help me get past 13???  :D


To inspire you to do so, here are some photos of some watermarbling I helped with.  In our new town, the water is pretty poor.  When I tried doing watermarbling for the first time here with tap water, it was a total disaster!  The water has so much extra "stuff" in it that the polishes wouldn't spread out.  After some of our new friends in town discovered my blog, some teenagers tried to do the watermarbling, too.  When they couldn't get it to work, they called me!  So I invited them to come over, and we used some bottled water to make these for their first day of school!  I always LOVE sharing nail art!  These were taken before any clean-up, so excuse the fact that they're a little "rough around the edges."


This weekend is an American Holiday - Labor Day - so I'll be trekking out to see all my family and I'm taking all my "Nail Art Toys" with me so be in the lookout for NEW nail art designs after the weekend!  HAPPY POLISHING!!